

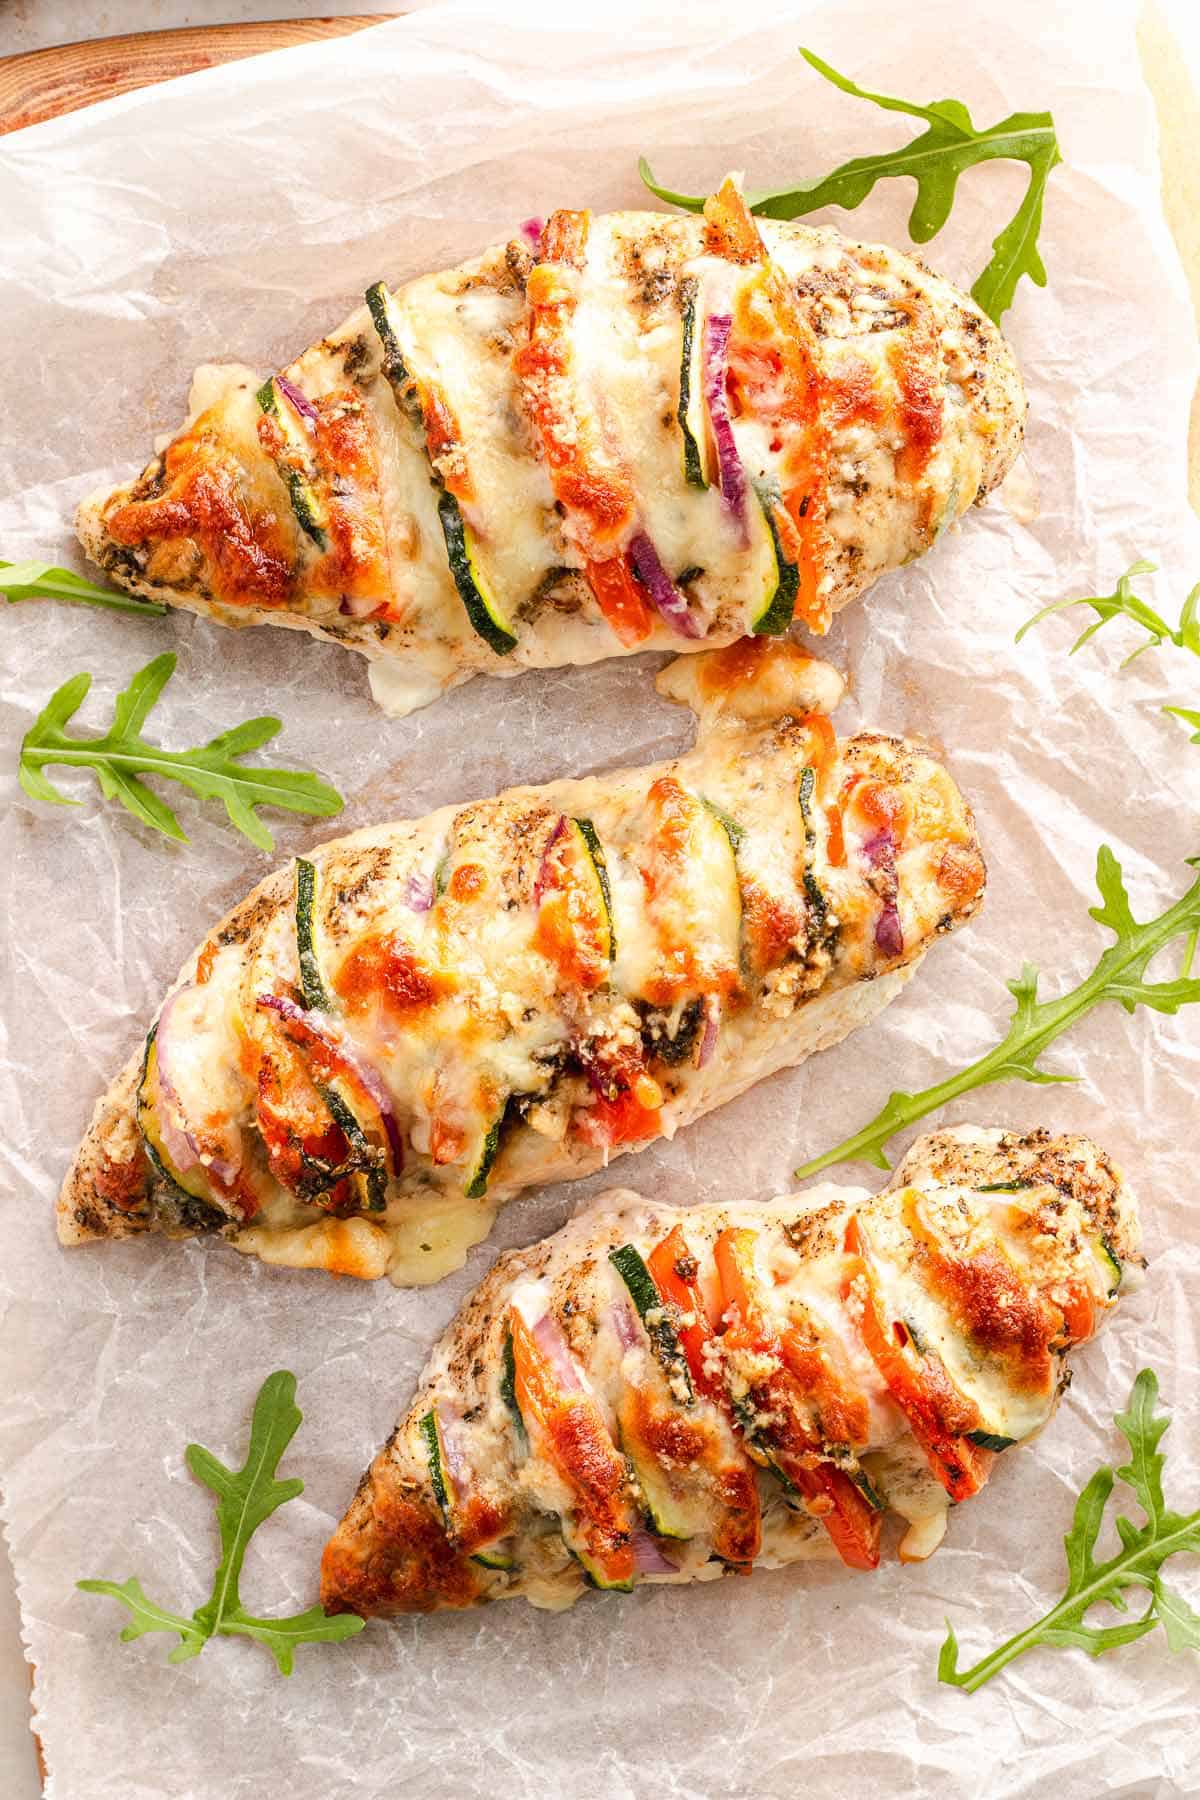
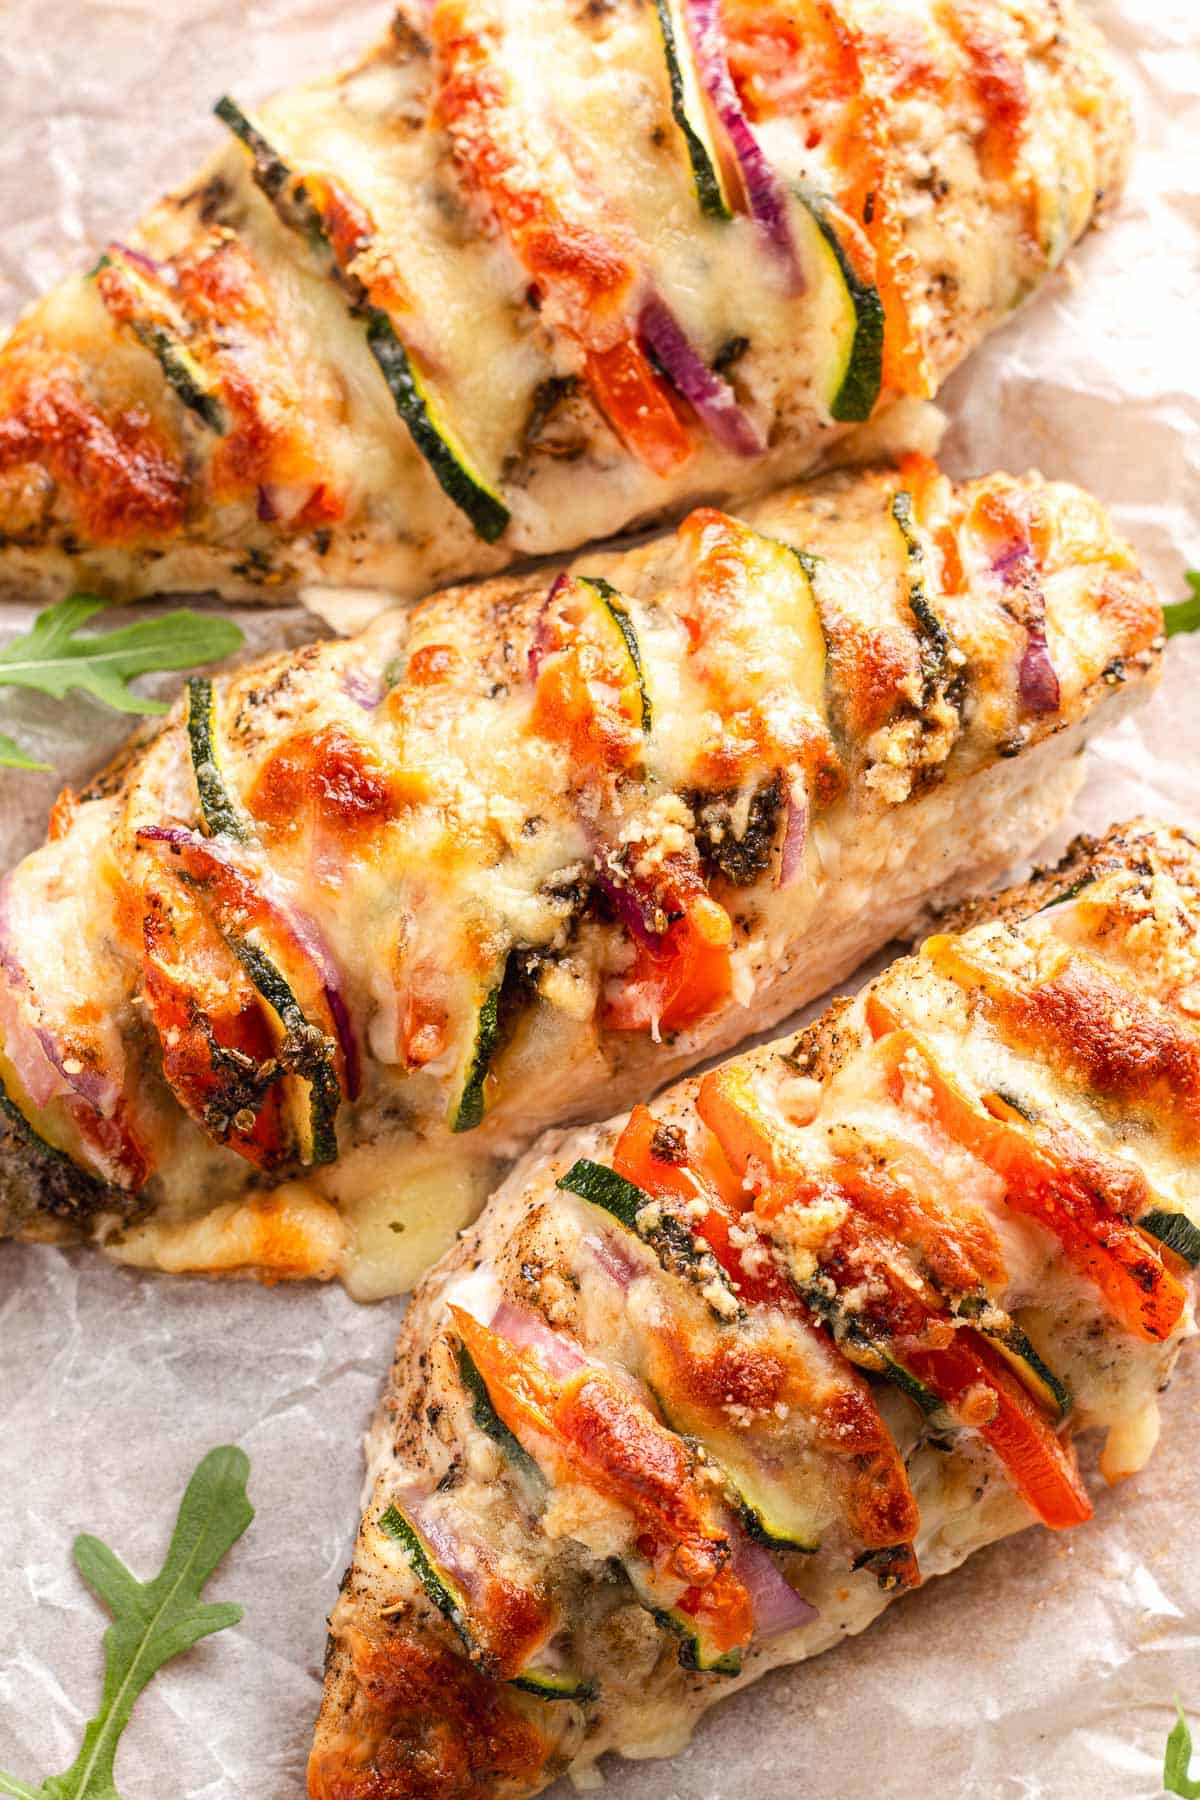
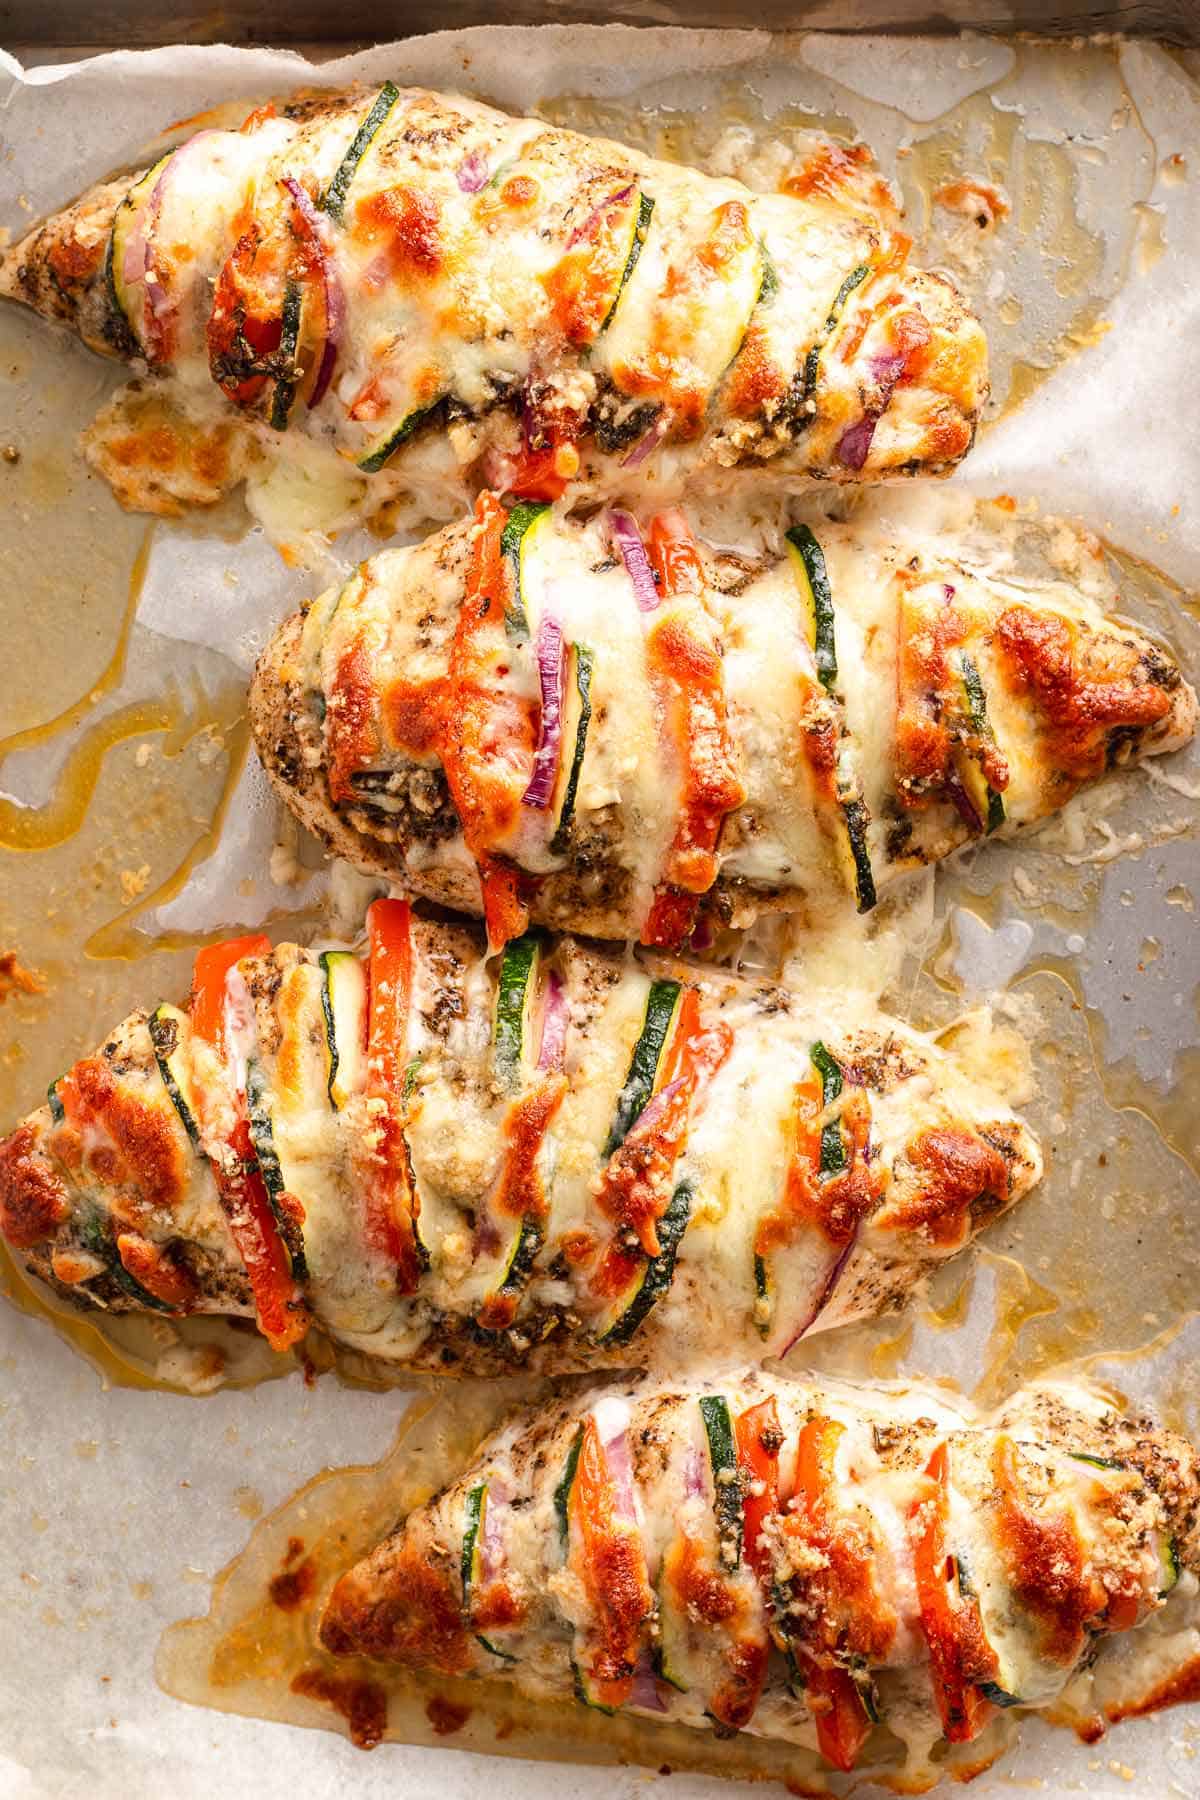
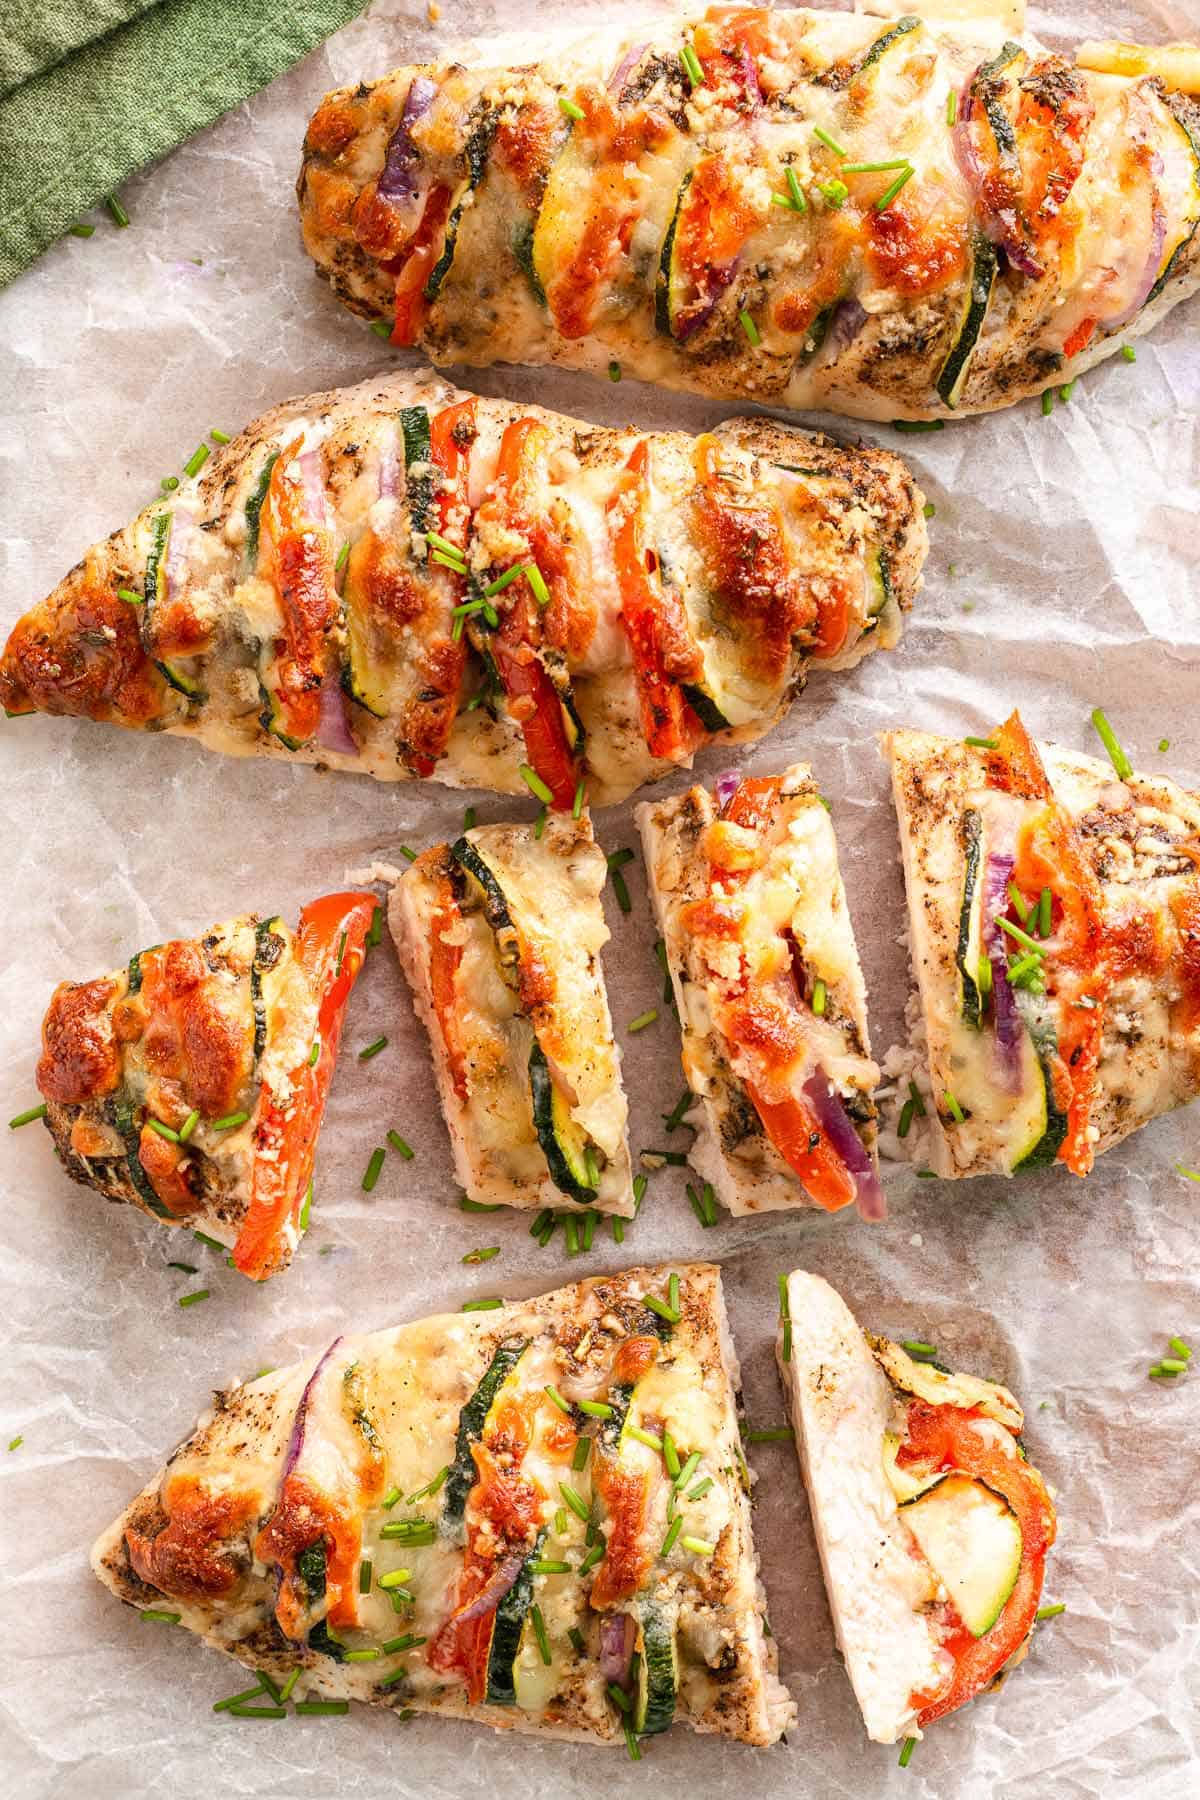
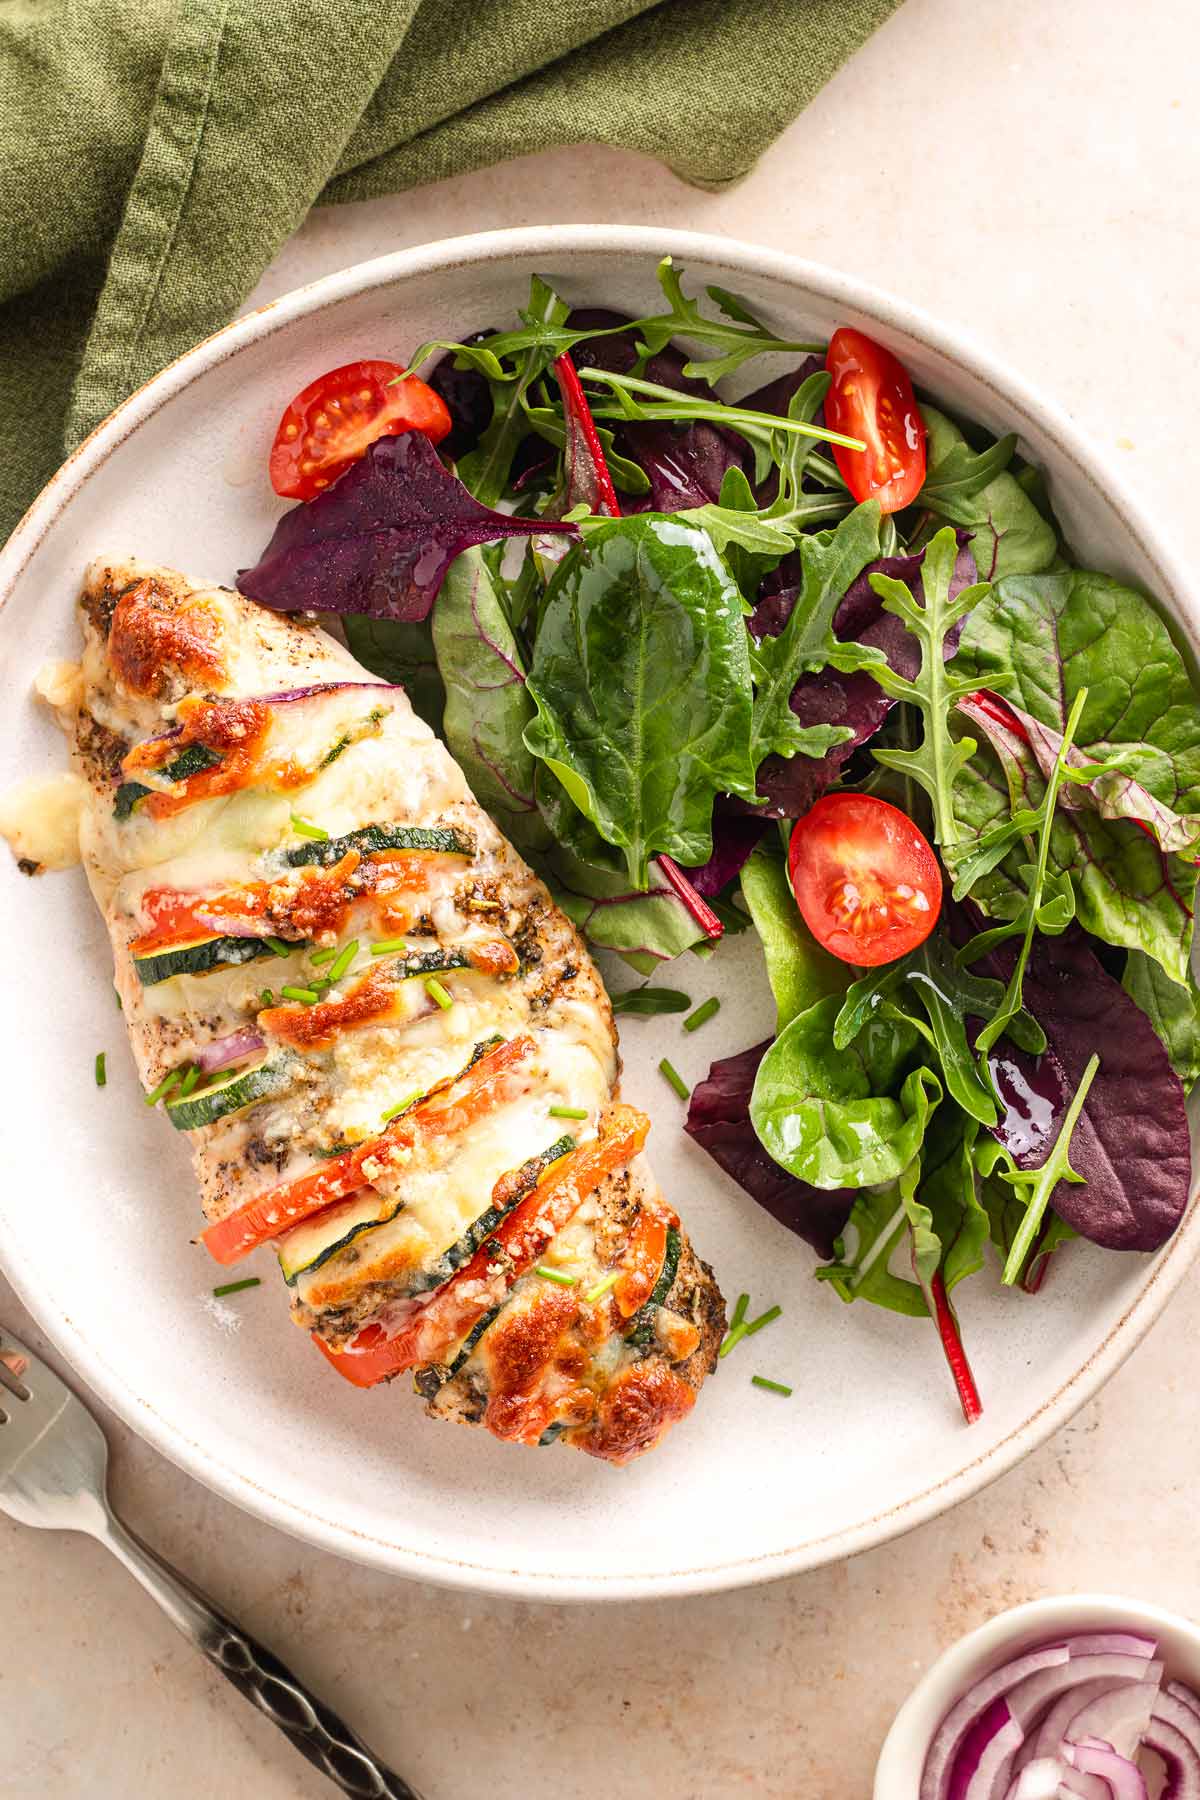
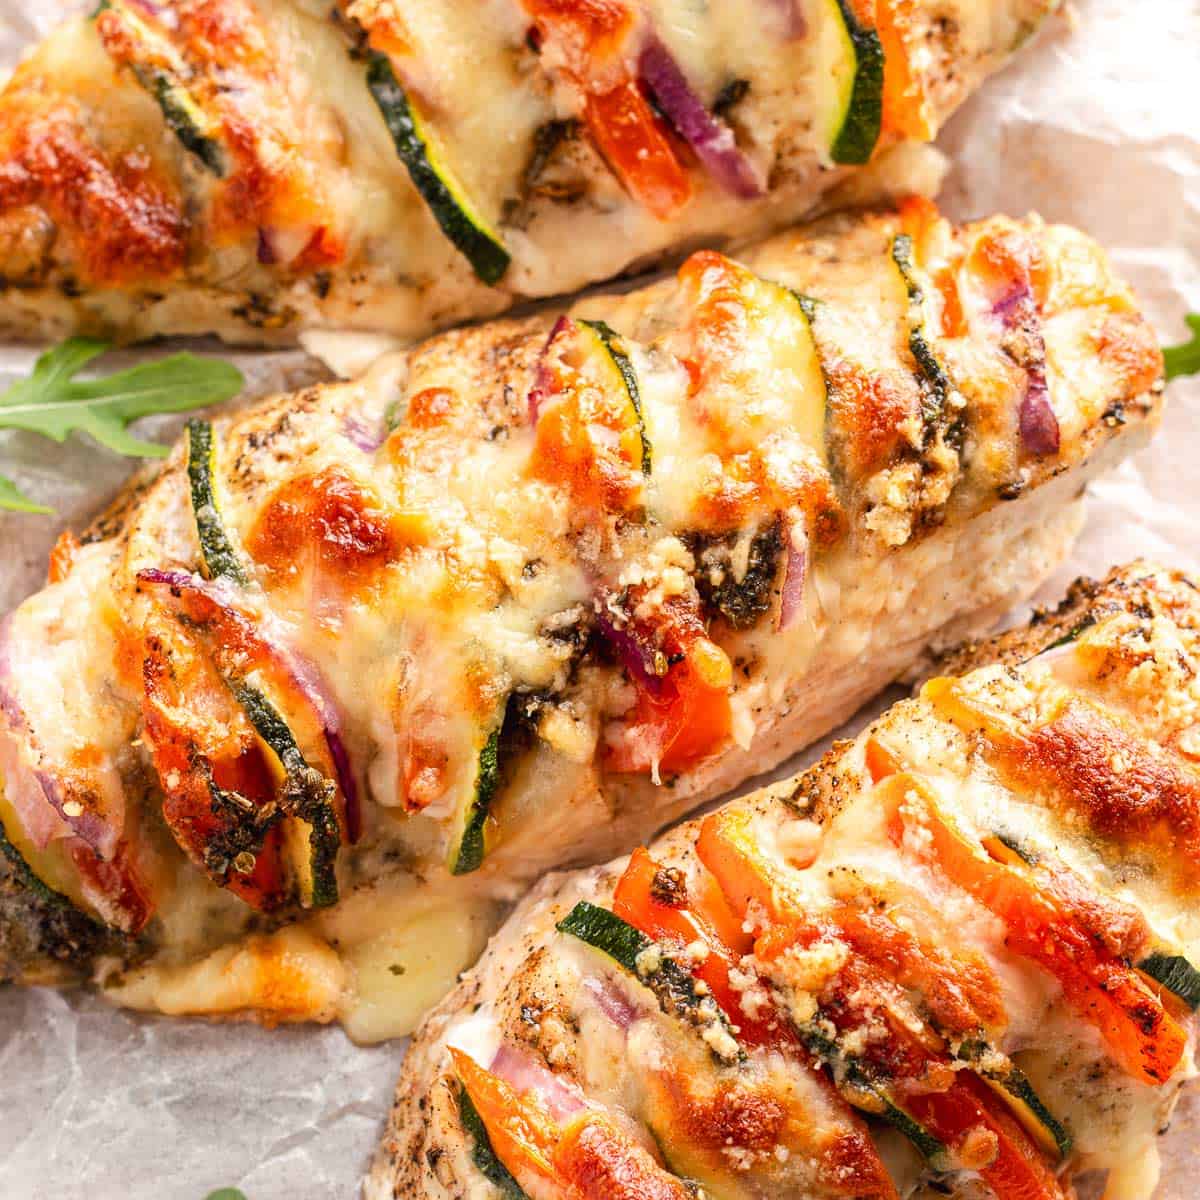
This Italian-inspired vegetable stuffed chicken is one of those dinners that looks much fancier than the effort it actually takes. Juicy baked chicken breasts are filled with zucchini, tomatoes, red onion, and plenty of melty cheese, then roasted together on a sheet pan until golden and bubbly.
Want to Save This Recipe?
Enter your email and we’ll send the recipe directly to you!
By submitting this form, you consent to receive emails from The Yummy Bowl.
The Chicken Dinner That Makes Weeknights Feel Fancy
I started making this recipe as a way to use up extra summer vegetables, and now it's one of my favorite weeknight dinners. It's fresh, colorful, high in protein, and somehow feels a little special even on an ordinary Tuesday.
Julia's Why-You'll-Love-It List
- This recipe checks all the boxes for me. It's simple enough for a busy weeknight but pretty enough to serve when friends come over.
- I love that it's a complete meal built around real ingredients. The vegetables soften and become sweet in the oven, while the cheese creates those irresistible golden edges that everyone seems to fight over.
- My boys don't always get excited about zucchini, but tucked inside cheesy chicken? Not a single complaint. I call that a dinner win.
- And here's my honest opinion: fresh mozzarella and freshly grated parmesan are absolutely worth it here. I've tried shortcuts, and the texture just isn't the same.
- The leftovers surprised me too. I expected the vegetables to get watery, but reheated slices were still juicy and delicious the next day.
Ingredients
- Chicken breasts - Large boneless, skinless chicken breasts work best because they're easier to stuff. Tip: If your chicken breasts are very thick, slice them horizontally first to create more even portions.
- Zucchini - Thinly sliced zucchini cooks quickly and blends beautifully with the Italian flavors. You can substitute yellow squash if needed.
- Tomatoes - Vine tomatoes add freshness and just enough moisture. Roma tomatoes work well too.
- Mozzarella cheese - Freshly grated mozzarella melts beautifully and creates the best cheesy topping. I strongly prefer grating it yourself rather than buying pre-shredded cheese.
- Basil - Fresh basil at the end makes a huge difference. I skipped it once and immediately regretted it!
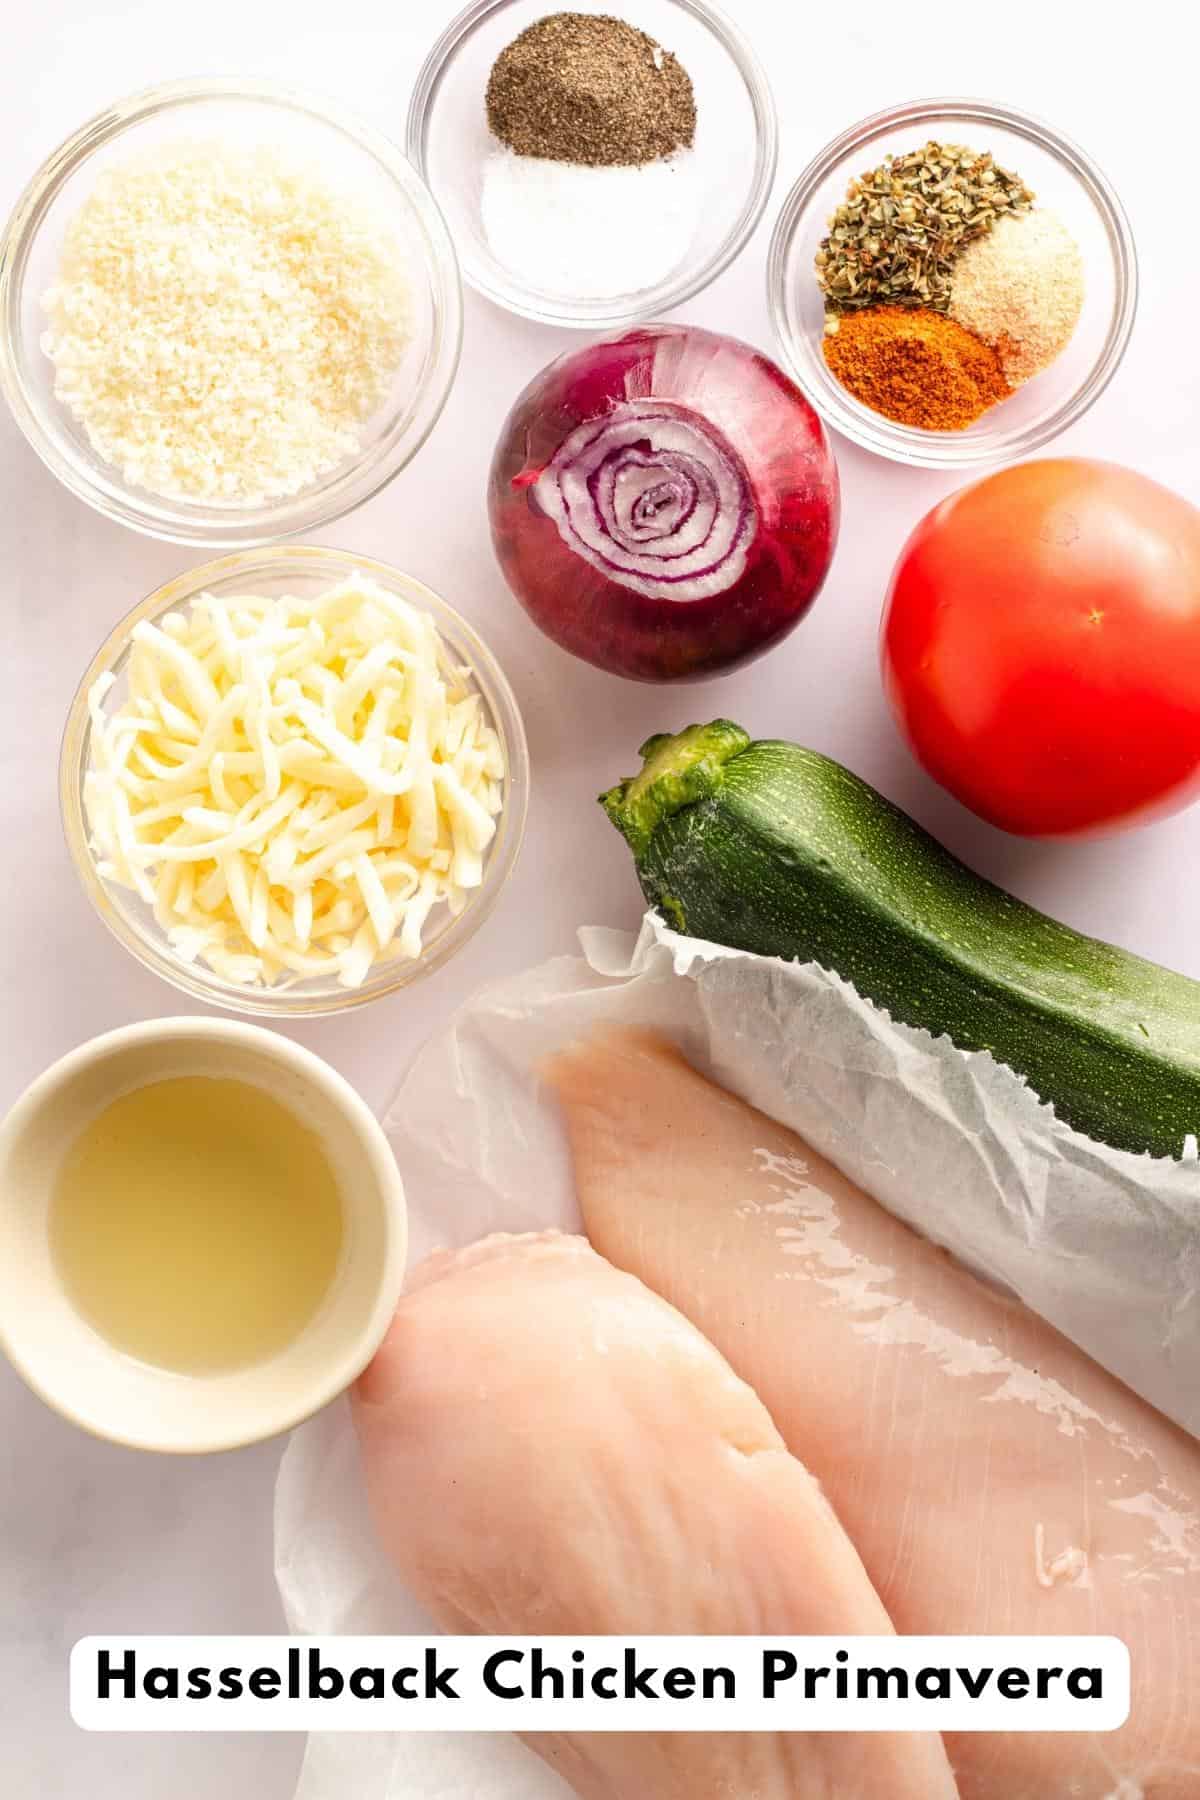
📋 You can find the full ingredient list in the Recipe Card below the article.
How To Make Hasselback Chicken
- Preheat the oven: Heat oven to 425°F. Line a sheet pan with parchment paper.
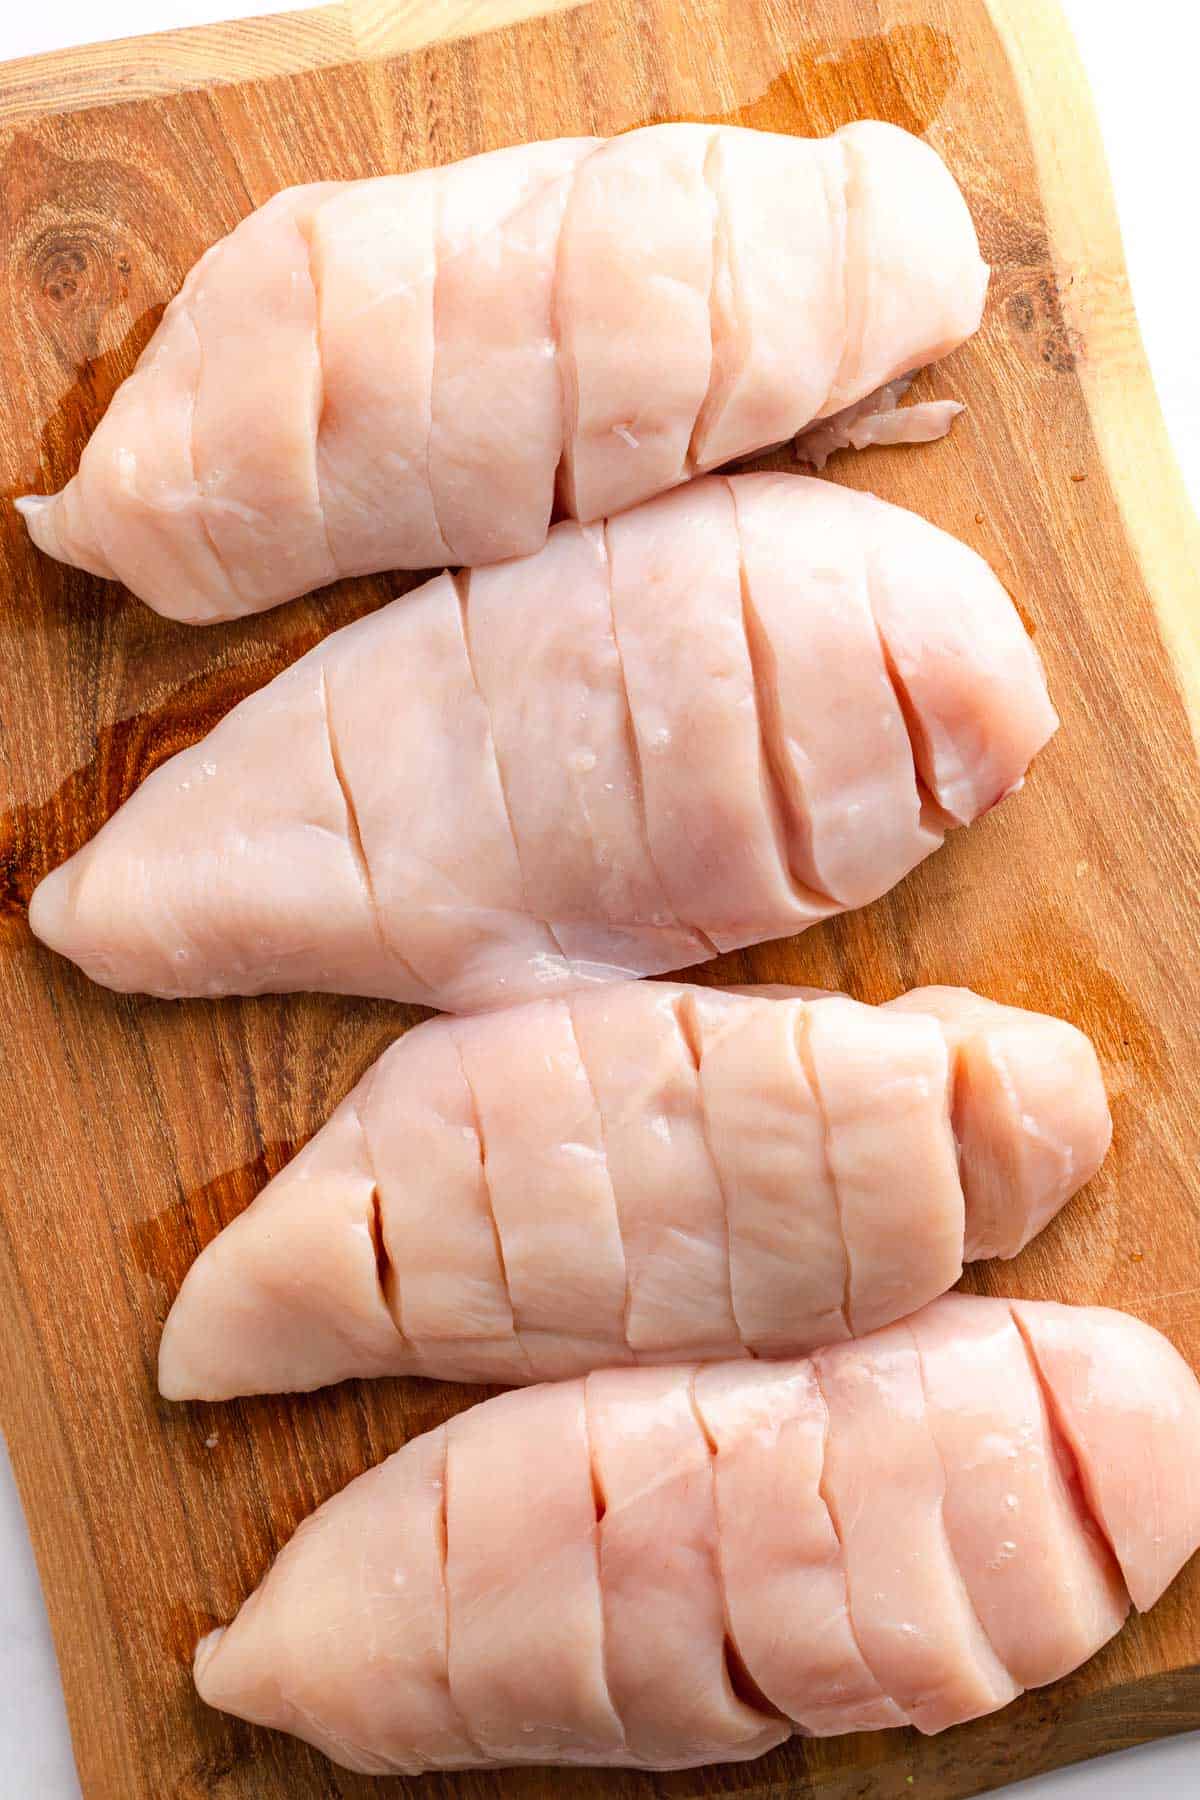
- Prepare the chicken: Using a sharp knife, cut evenly spaced slits across each chicken breast, leaving about ¼ inch intact at the bottom. PRO tip: Place wooden spoons or chopsticks alongside the chicken to avoid cutting all the way through.
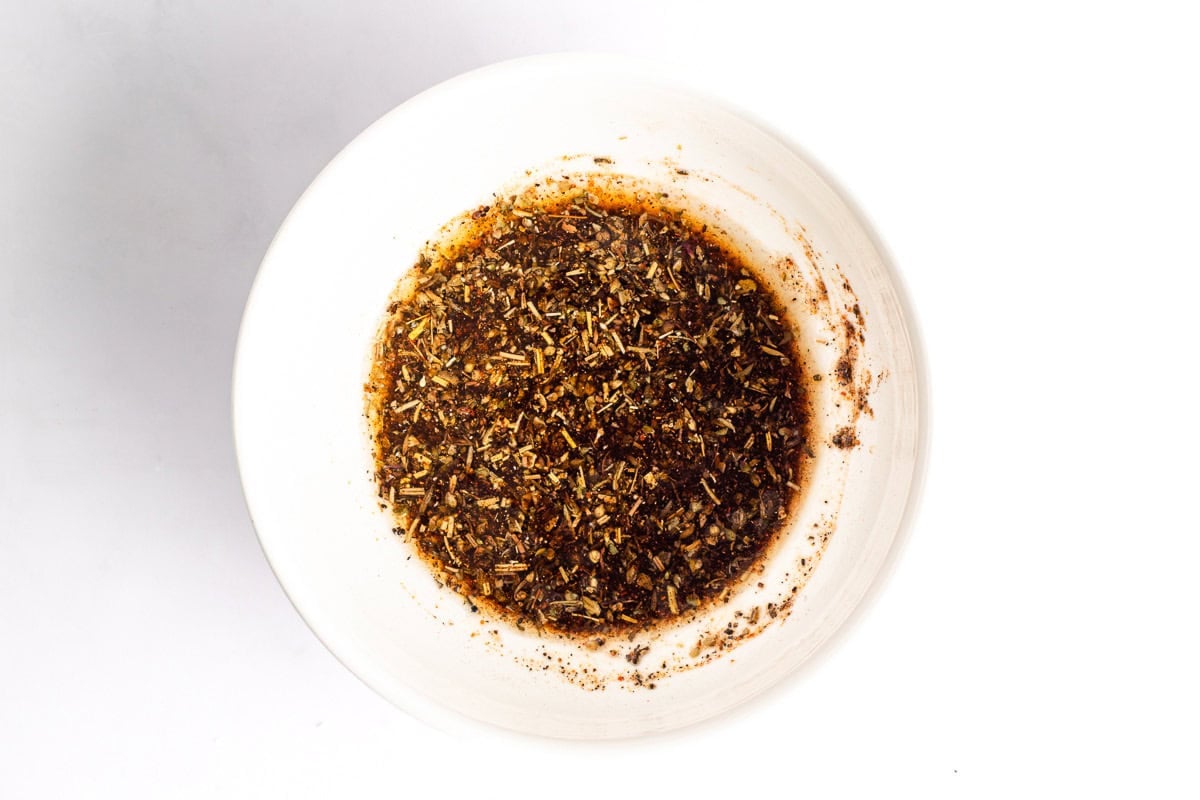
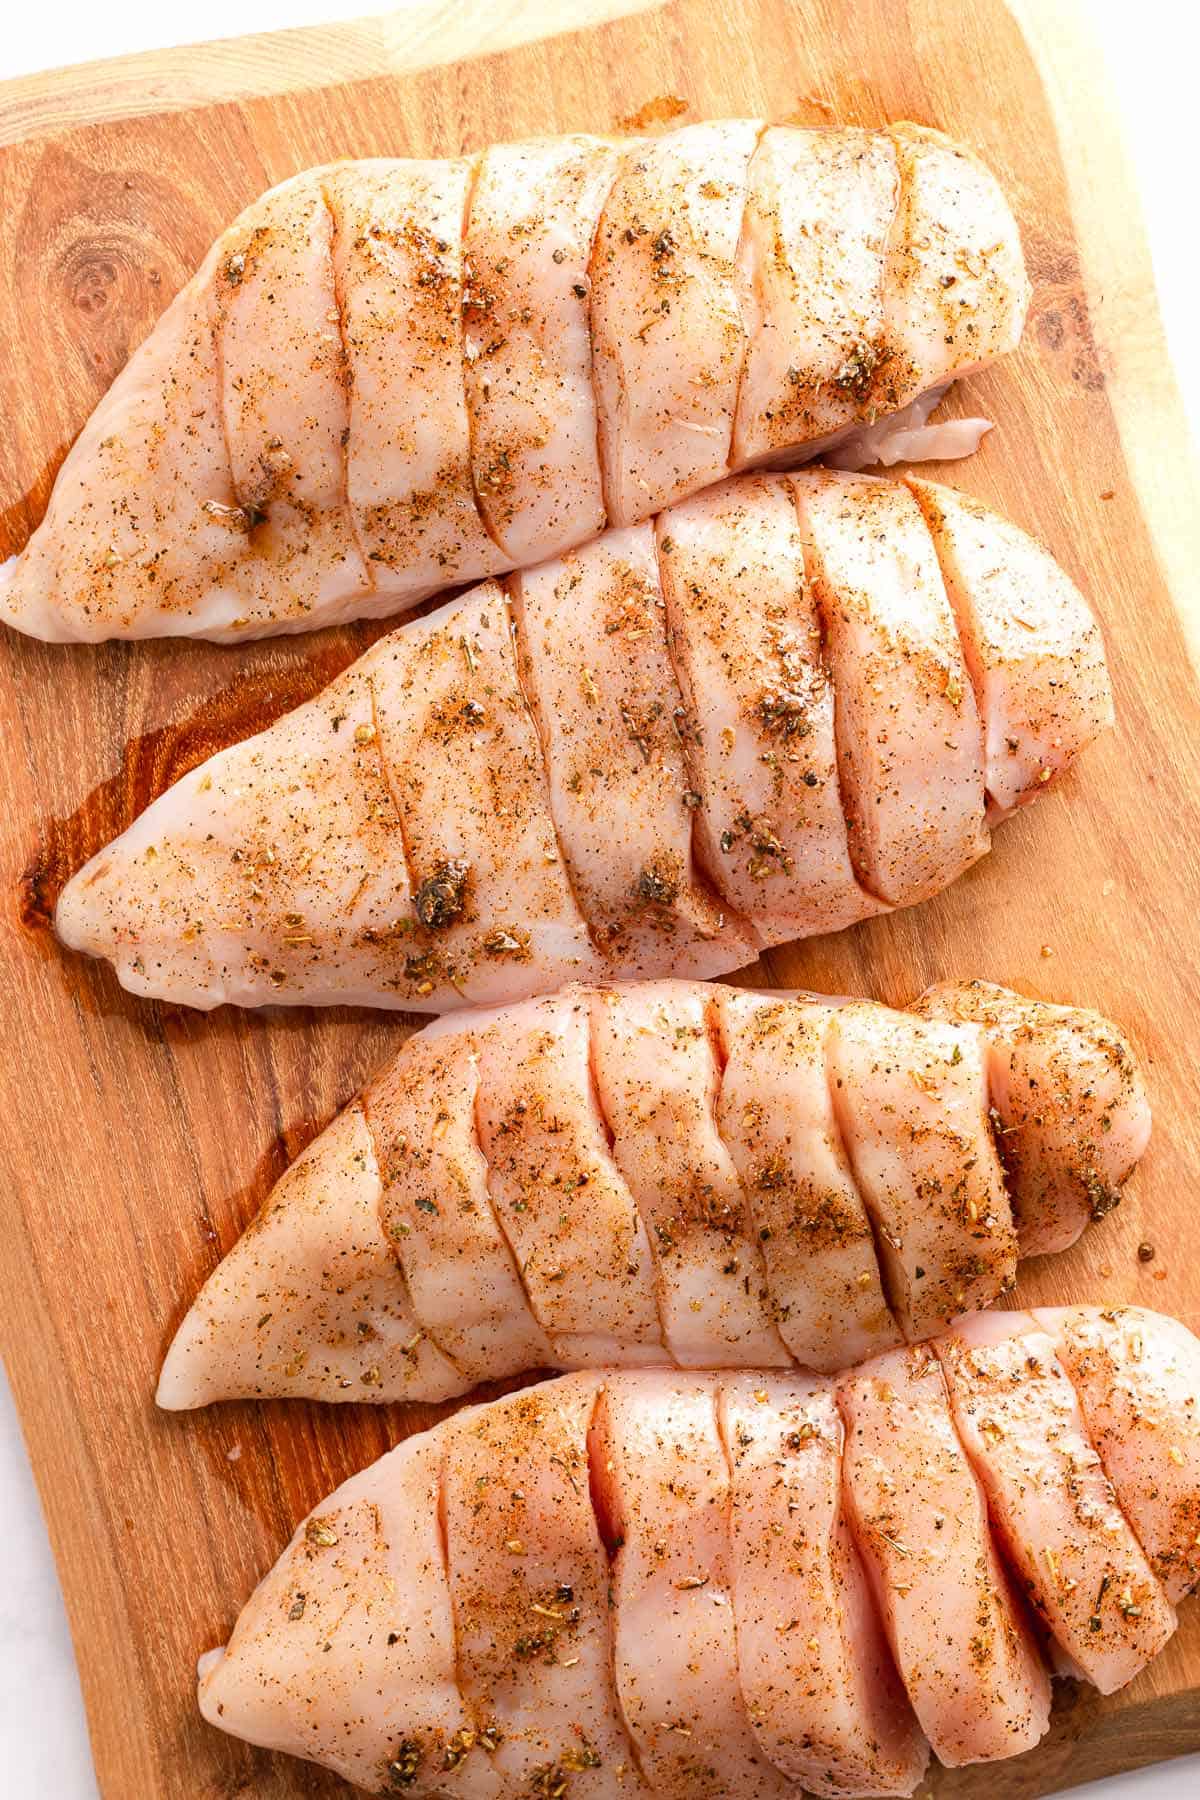
- Season the chicken: Mix olive oil, salt, pepper, garlic powder, paprika, and Italian seasoning. Brush the mixture over the chicken. I used to drizzle everything directly on top, but brushing the seasoning into the slits helps every bite taste better.
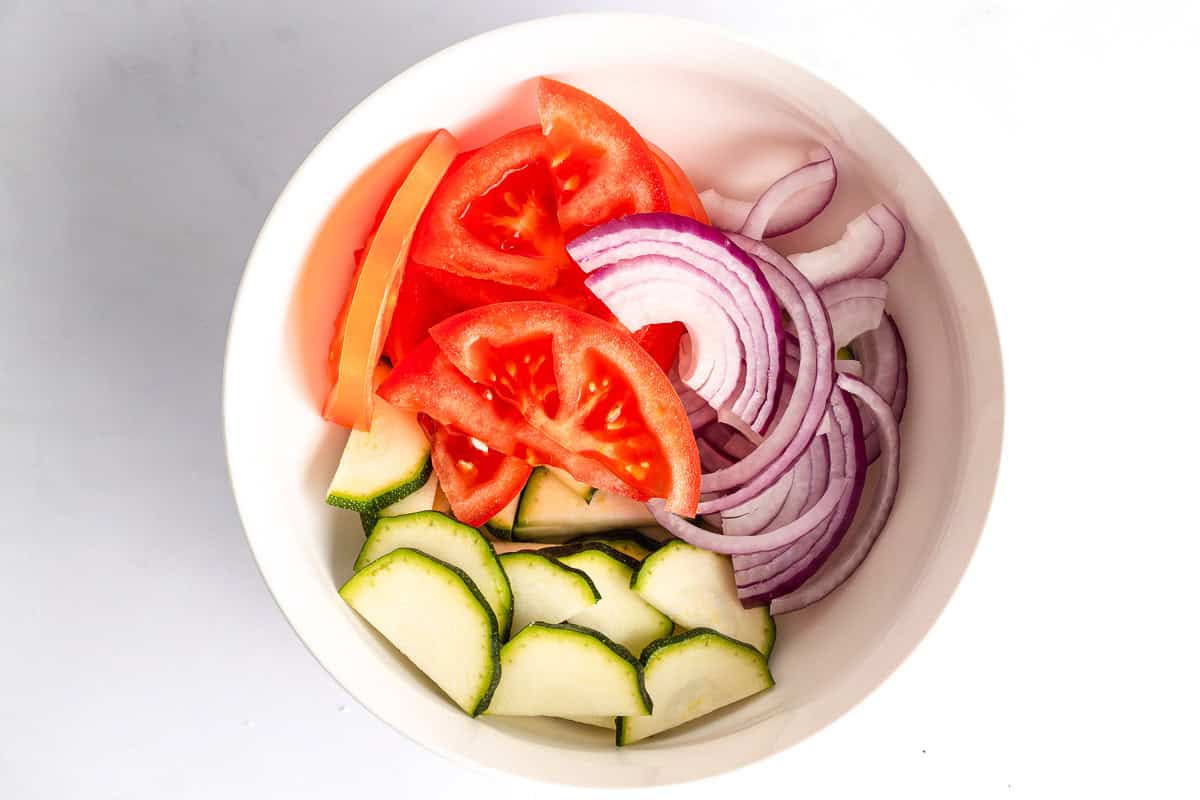
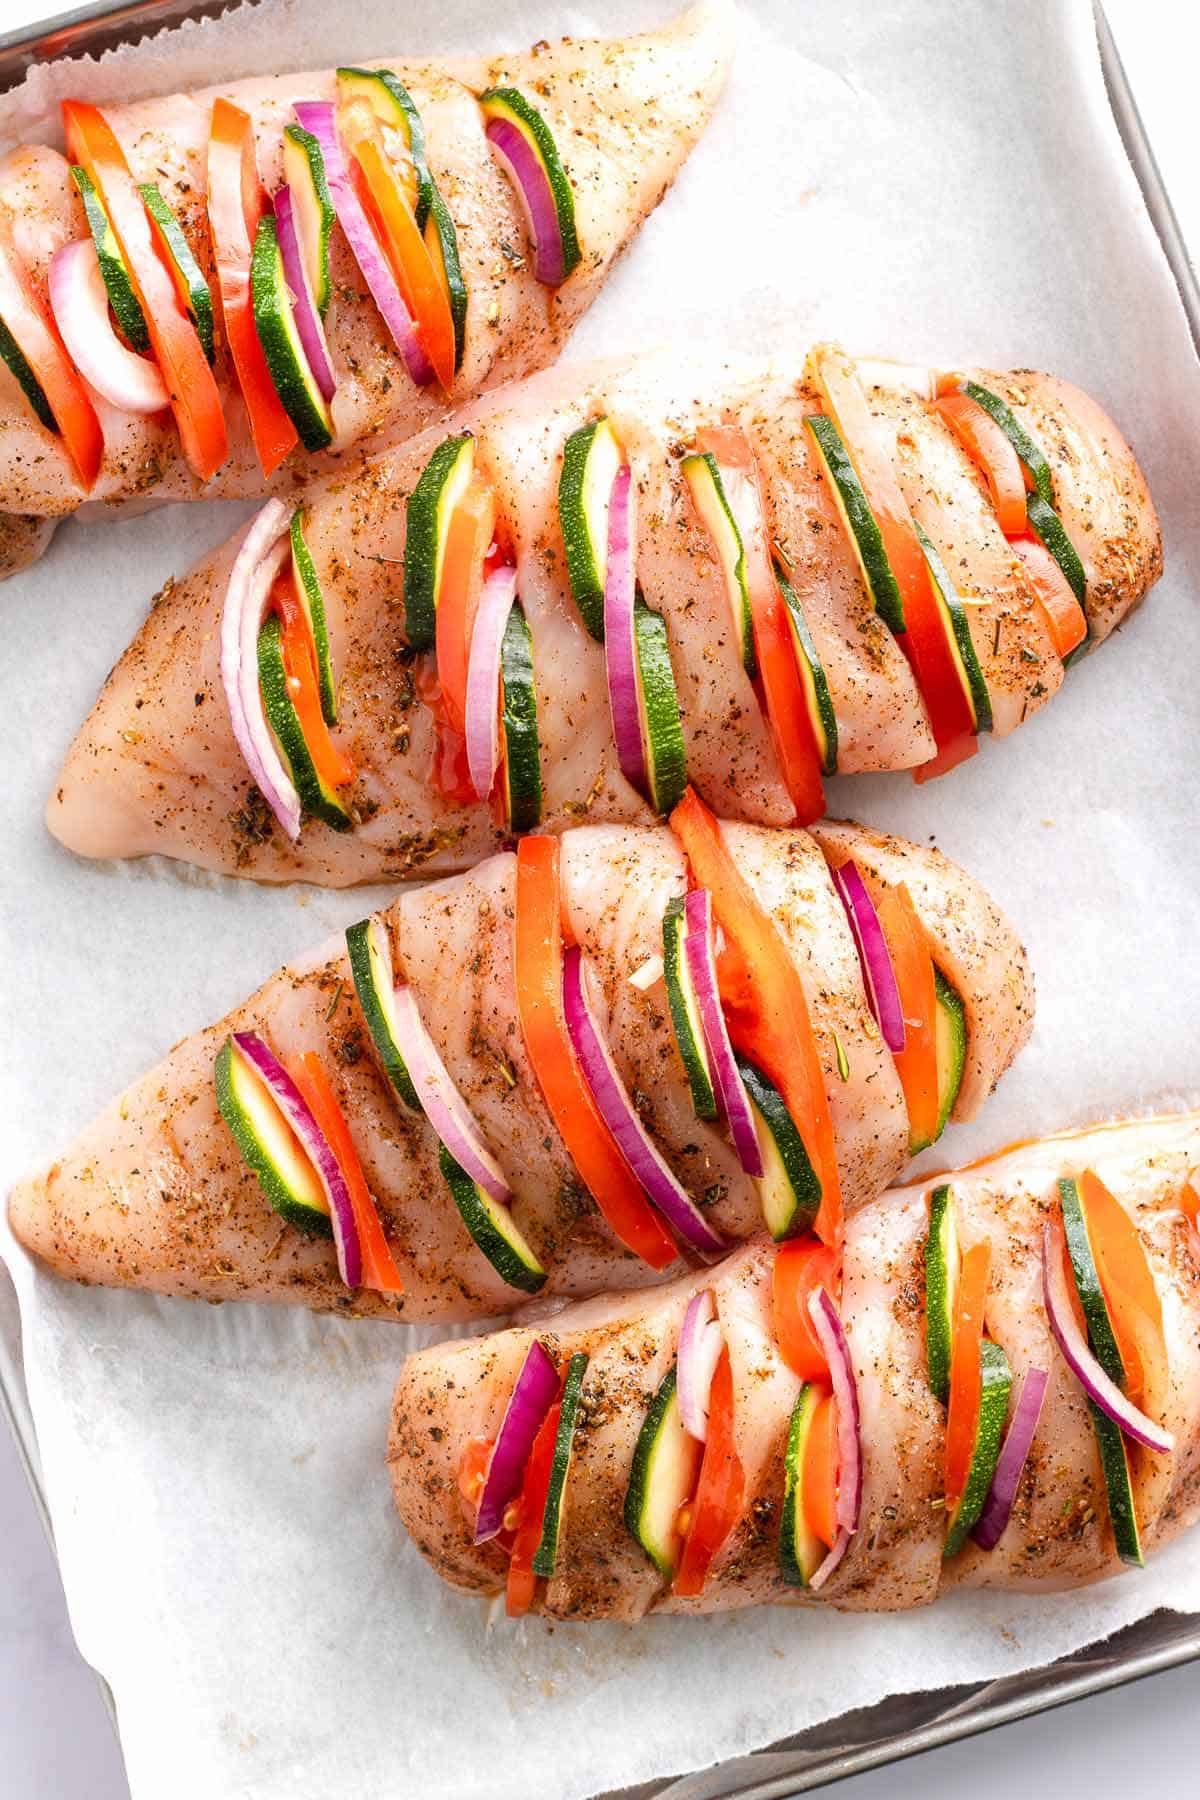
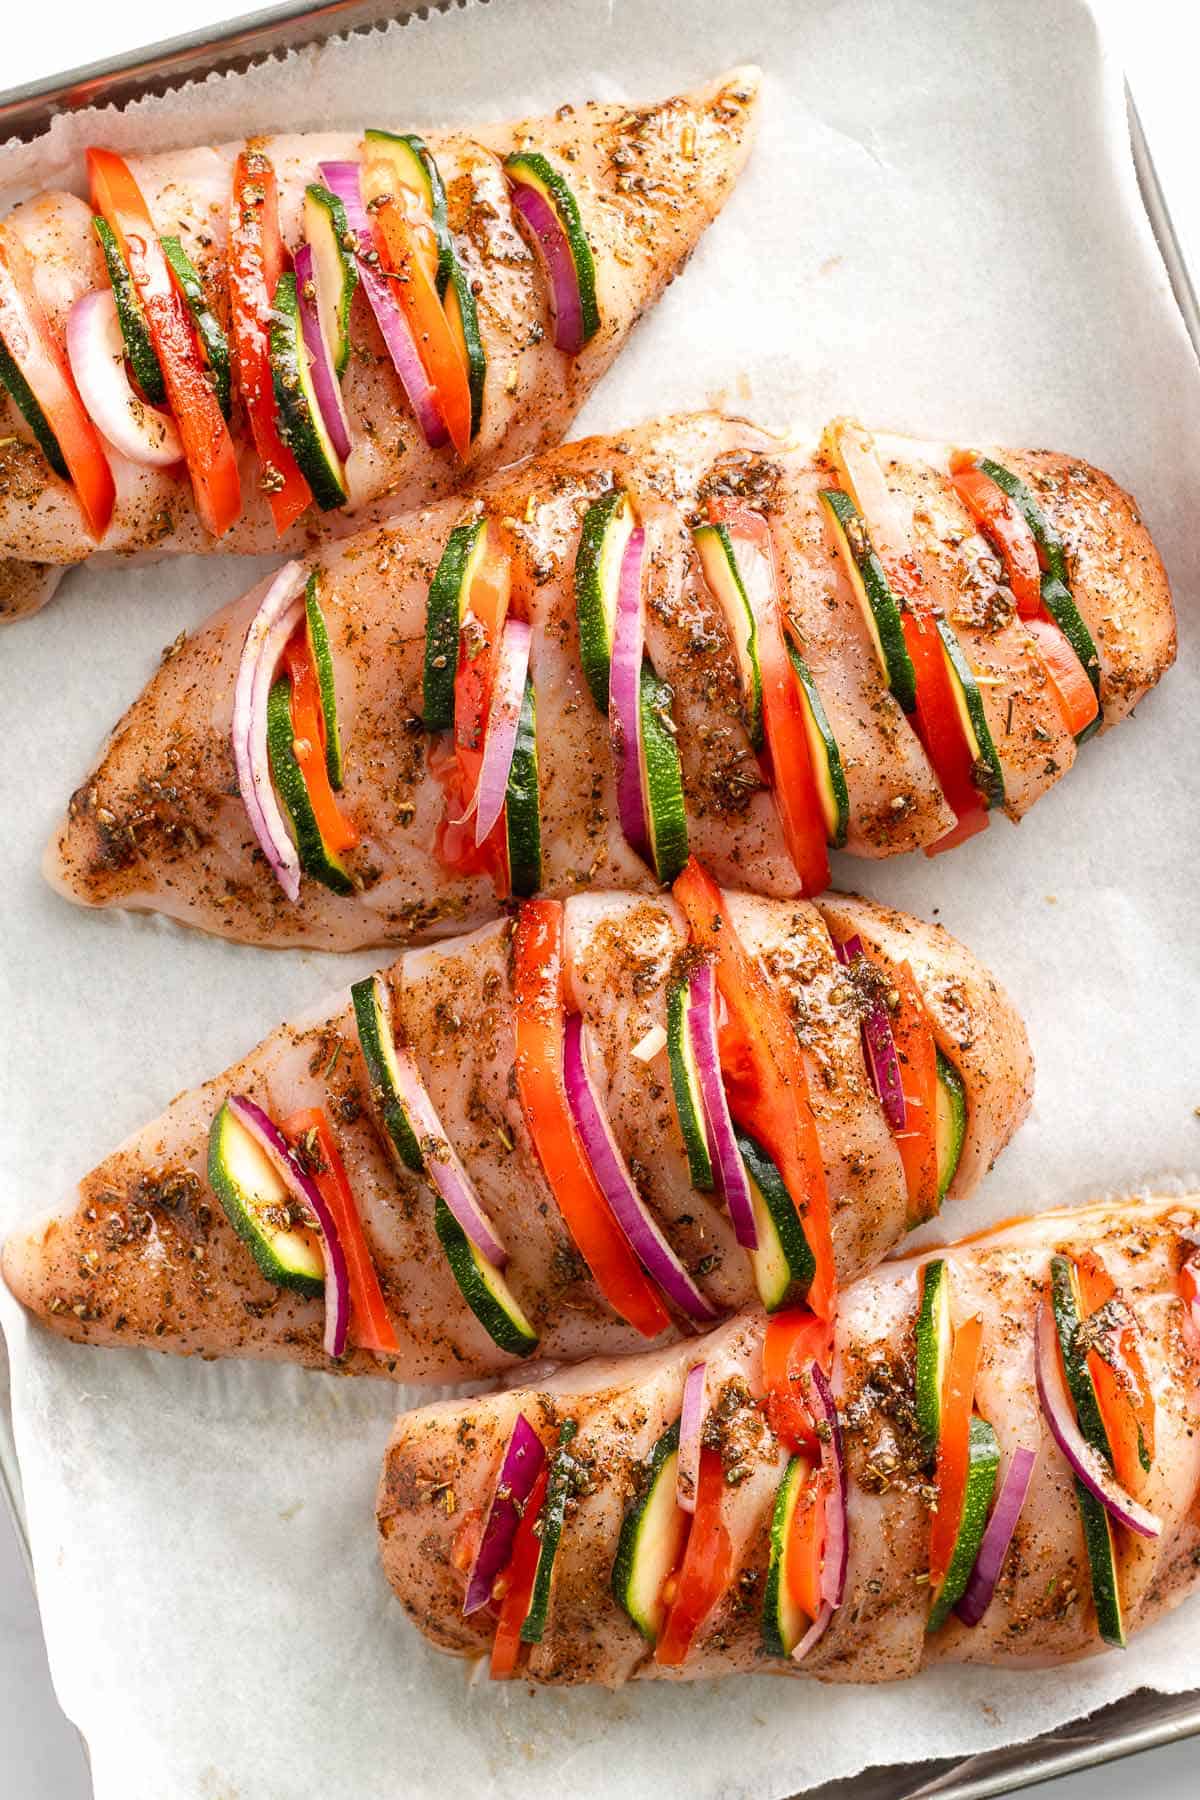
- Stuff the chicken: Gently fan open the cuts. Tuck slices of zucchini, tomatoes, and red onion into each slit. Brush remaining seasonings on top. Alternate the vegetables for the prettiest presentation.
- Add the cheese: Sprinkle mozzarella and parmesan evenly over the chicken.
- Bake: Transfer the sheet pan to the oven and bake for 17-20 minutes, or until the chicken reaches 165°F internally. Optional step: Broil for the final minute if you'd like extra golden cheese.
- Finish and serve: Garnish with chopped basil before serving.

Tools I Used Here
 Buy Now →
  Buy Now →
  Buy Now →
  Buy Now →
  Buy Now →
 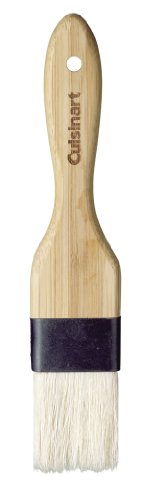 Buy Now →
  Buy Now →
 Broil only at the end.
If you want those golden, bubbly cheese spots, broil for just 30-60 seconds and keep a close eye on it. Cheese can go from beautifully browned to burnt surprisingly fast (ask me how I know!).
Tips
- Choose chicken breasts that are similar in size. If one piece is much thicker than the others, you'll either end up with dry chicken or undercooked centers. If needed, slice extra-large breasts horizontally first.
- Don't make the Hasselback cuts too close together. About ½ inch apart works well. If the slits are too thin, the vegetables won't fit and everything gets pushed out during baking.
- Pat the vegetables dry before stuffing. Tomatoes release moisture as they cook, so removing excess liquid helps prevent the chicken from becoming watery.
- Check the chicken early. Depending on the thickness of your chicken breasts, this recipe may be done closer to 17 minutes. A thermometer is the easiest way to avoid dry chicken.
What I Serve This With
I usually keep the sides simple because the chicken already has vegetables built in.
If I would serve it with something it would beL
- Roasted baby potatoes
- Garlic mashed potatoes
- Steamed green beans
- Bulgur pilaf
- Quinoa
- A crisp side salad
- Crusty bread to soak up the cheesy juices
If you're meal prepping, slice the leftover chicken and serve it over grains for lunch. Honestly, the leftovers might be my favorite part.
Storing Leftovers
- To Store. Store leftovers in an airtight container in the refrigerator for 3-4 days.
- To Freeze. Freeze cooked portions for up to 2 months. Wrap tightly before freezing for best results.
- To Make Ahead. Prepare and stuff the chicken up to 8 hours ahead. Cover and refrigerate until ready to bake.
- To Reheat. For the best texture (like fresh), reheat leftovers in the air fryer at 350°F for 4-6 minutes, or until the chicken is warmed through. The cheese gets melty again, and the edges crisp up just a little. If reheating from frozen, let the chicken thaw overnight in the refrigerator first, then air fry as directed.
- You can also use the oven at 350°F for 10-15 minutes if you're reheating a larger batch. Cover loosely with foil if the cheese starts browning too quickly.

Before You Head Out
If you gave this recipe a try, I'd be so thankful if you could leave a ★★★★★ rating and review below. It helps other readers, supports my work, and means the world to me. Thank you for being part of The Yummy Bowl family. Happy cooking! ❤️
Recipe Card
Ingredients
Equipment
Method
- Prep the oven and pan: Preheat the oven to 425°F and line a sheet pan with parchment paper for easier cleanup.
- Slice the chicken: Using a sharp knife, cut evenly spaced slits across each chicken breast, leaving about ¼ inch intact at the bottom so the chicken stays together. Aim for cuts about ½ inch apart. I like to take my time with this step because it makes stuffing the chicken much easier later on.1½ boneless
- Season the chicken: In a small bowl, mix the olive oil, salt, black pepper, garlic powder, sweet paprika, and Italian seasoning. Brush the mixture all over the chicken, making sure some gets inside the slits too. Don't brush everything, leave some for the veggies. I find this much less messy than sprinkling the seasonings directly over the chicken.1 tablespoon extra virgin olive oil, 1½ teaspoon kosher salt, ½ teaspoon black pepper, ½ teaspoon garlic powder, ½ teaspoon sweet paprika, 1 teaspoon Italian seasoning
- Stuff with vegetables: Gently fan open the cuts and tuck slices of zucchini, tomato, and red onion into each slit. Try not to overstuff them, or the vegetables may slide out during baking. brush with remaining seasonings.1 small zucchini, 1 vine tomato, ½ red onion
- Add the cheese: Sprinkle the mozzarella and Parmesan evenly over the top of each chicken breast. Don't worry if some cheese falls onto the sheet pan; those crispy cheesy bits are often the first thing to disappear at my house.½ cup freshly grated mozzarella cheese, ¼ cup freshly grated Parmesan cheese
- Bake until juicy: Bake for 17-20 minutes, or until the thickest part of the chicken reaches 165°F on an instant-read thermometer.
- Broil for extra color (optional): For a more golden, bubbly cheese topping, broil for 30-60 seconds at the end. Keep a close eye on it because the cheese can brown quickly.
- Garnish and serve: Finish with freshly chopped basil and serve warm. I usually add an extra sprinkle of Parmesan just before serving because, in my opinion, there's no such thing as too much cheese in this recipe.Chopped fresh basil
Nutrition
Notes
- Don't rush the slicing. The chicken needs to stay attached at the bottom, so slow little cuts are better than one confident slice that goes too far. I've done that before, and it basically turns into chicken pieces instead of stuffed chicken.
- Use bigger chicken breasts if you can. They are easier to slice and stuff. Smaller pieces still work, but they can be a little fiddly.
- Go easy on the tomatoes. Tomatoes add great moisture, but too many slices can make the pan watery. If your tomato is extra juicy, blot the slices quickly with a paper towel.
- Freshly grated cheese is worth it here. It melts softer and gives the top a nicer finish. Pre-shredded cheese works in a pinch, but it won't melt quite as smoothly.
- Start checking at 17 minutes. Chicken breast can go from juicy to dry pretty quickly. I always use a thermometer here because guessing with stuffed chicken is not my favorite kitchen gamble.
Storage
- To Store: Store leftovers in an airtight container in the refrigerator for 3-4 days. I like to keep the chicken in shallow containers so it cools quickly and reheats more evenly.
- To Freeze: Freeze cooled portions for up to 2 months. Wrap each piece well or store in a freezer-safe container. Thaw overnight in the refrigerator before reheating.
- To Make Ahead: You can slice, season, and stuff the chicken up to 8 hours ahead. Cover tightly and refrigerate until you're ready to bake. I wouldn't prep it much earlier than that because the tomatoes and zucchini start releasing moisture.
- To Reheat: My favorite way to reheat this chicken is in the air fryer at 350°F for 4-6 minutes, or until warmed through. The cheese gets melty again, the edges perk back up, and it tastes much closer to freshly baked.
Tried this recipe?
Let us know how it was!Note: Nutrition information is estimated and varies based on the products used.
Full Nutrition Disclaimer can be found here.
Join TYB
Insider
Get access to exclusive recipes,
weekly meal plans, printable
grocery lists, and AD-FREE
browsing designed to make
mealtime easier.


Sher
For anything hasselback, I use chopsticks or wooden spoon handles on each side of the chicken, so you do not accidently slice through. Works great!